⇒⇒ Internal LOL Email Marketing Training
Hi! If you’re here, it’s because you want to get trained on our email marketing procedures…you’re in the right place 🙂
Below, I’ll walk you through the processes I use to send emails out through iContact – trust me, it’s much easier than it seems once you get the hang of it. As with anything else, you will get much more training from iContact by actually using it and snooping around in it.
If you have any questions, contact me at Juan@liveoutloud.com.
WHAT TO KNOW BEFORE YOU START
- > To send out a manual email, go to: https://www.icontact.com/login
- The username is: liveoutloud
- Password: LOLemail2013
- > Once you log in, you will see options to view past emails, upload contact lists you have pulled from Infusionsoft, send new emails, send templated emails – the whole shebang. Just focus on the “Email” & “Contacts” tabs.
- > Our email marketing calendar is here >>.
- This calendar is primarily used to keep track of our affiliate email sends & other big sends. It is ran through Loral’s Google calendar account (User: askloral@gmail.com, Password: w3@lthy1).
- I used to upkeep it very regularly, but we did not follow it too much, so maintenance has not happened on it lately.
- Use this calendar to keep track of and & all emails that are on your radar. The reason you want to do this is because if an affiliate asks when we have room in our emailing schedule to send, you can reference this document to see when we have space and make sure that it fits with our internal sending.
- > If someone asks you to schedule an email, ask them: What list they want to send to, what copy they want sent, what lists you should exclude, & when they want the email sent – your job is to send the email through our system, their job is to give you all of the information you need to send it out to the appropriate lists.
- > If you need help pulling big lists (such as a master contact list for ALL Live Out Loud contacts, or a master LBT list, ask Jeff for help. He’s a database king.
- > Our account representative is Brendan Matthews: 919.957.6242 bmatthews@icontact.com
- Brendan is the guy you talk to in case something is up with our account or if we need any help for any reason.
- I will introduce you via email when the transition is made.
- > Here is an example of some email swipe copy I’ve sent in the past. Leanne, Dawn or someone else should send you the email swipe copy for you to send in your emails. Send it exactly how it looks.
- > Things to keep in mind when sending an email:
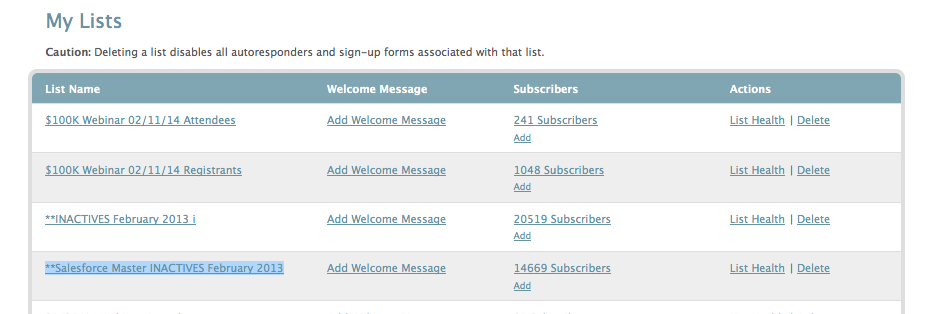
- 1) Always exclude our ‘Inactive’ email lists. There are 3 of these lists. These lists have all of the email addresses which are not active, and can drive our SPAM score up when sending to them. Exclude these lists on ALL of your email sends.
- 2) Always use your best judgment to exclude ‘warm’ lists. What I mean by ‘warm’ lists are lists that we’re actively sending to for something else.
- >> For example, if we’re marketing for a Preview event in Los Angeles, exclude the “TL – Los Angeles” list from a list to an invite to our Make New Money event because we don’t want to double email them with these 2 emails. So, make sure to exclude lists that we’re sending to for something else.
THE TYPES OF EMAILS YOU WILL HAVE TO SEND OUT
- > Event promotions
- > Holiday promotions
- > Newsletter updates
- > Event updates
- > Affiliate emails
- > Post-event emails
- > Webinar invites
SENDING AFFILIATE EMAILS
Sending affiliate emails is a bit tricky when it comes down to what lists to send to and how many email contacts to send to.
So, with regards to what to send an affiliate email to, keep these things in mind:
- > Always ask the person (our affiliate manager) who gives you the affiliate email how many people the email should be sent to.
- * If they do not have a number in mind, start getting them in the mindset of clarifying this number with the affiliate. With affiliate partnerships, there should also be some contact-for-contact partnership, as we cannot simply send an email to 50,000 of our contacts at any given time.
- • If they do have a number in mind, great. When you’re selecting what lists to send to, use your good judgment and pick lists that add up to the number of contacts that you’re supposed to send to.
- >> This means that if our affiliate manager tells you to send to 20,000 contacts, select a group of lists that add up to about 20,000 email contacts. Make sense?
- > We have big email lists in our iContact account called “Master Lists” that contain most of our active emails.
- * These lists ^^^ are some of the bigger lists in our account that hold most of our active email addresses. Send to these lists when you have a big number you have to fulfill.
- >> A good rule of thumb is to ask Jeff Richmond to give you a fresh Master List every 3 months, just so you have our most updated mass contact list uploaded.
- > Things to keep in mind:
- 1) Always exclude our ‘Inactive’ email lists. There are 3 of these lists. These lists have all of the email addresses which are not active, and can drive our SPAM score up when sending to them. Exclude these lists on ALL of your email sends.
- 2) Always use your best judgment to exclude ‘warm’ lists. What I mean by ‘warm’ lists are lists that we’re actively sending to for something else.
- >> For example, if we’re marketing for a Preview event in Los Angeles, exclude the “TL – Los Angeles” list because we don’t want to double email them with this affiliate email and an email inviting them to the Preview event. Our internal events and promotions take precedent over affiliate sends. So, make sure to exclude lists that we’re sending to for something else.
- > Actually sending the email >>
- 1) After you load up the email and get to the point where you have to select what lists to send to – unless you are specifically instructed to do something else – choose lists that add up to about 20,000 people. Or, use your best judgment.
- 2) Exclude the ‘inactive’ lists and any other lists you might be currently sending to.
- 3) Send the email.
SKIP ALL OF THE TEXT BELOW – VIDEO TRAINING
To make this easier on you, I created a series of 6 videos that walks you through the entire process of sending out an email – from pulling a list from Infusionsoft, to uploading the list, to testing the email, to formatting the email correctly, to excluding certain lists, etc.
> Infusionsoft list pull to iContact email Video 1 – https://screencast.com/t/mcKxDv0x
> Infusionsoft list pull to iContact email Video 2 – https://screencast.com/t/ONnb6ryof
> Infusionsoft list pull to iContact email Video 3 – https://screencast.com/t/pocX7vkUKan
> Infusionsoft list pull to iContact email Video 4 – https://screencast.com/t/J0L9p0BX
> Infusionsoft list pull to iContact email Video 5 – https://screencast.com/t/Fdi4xExTOA6
> Infusionsoft list pull to iContact email Video 6 – https://screencast.com/t/MqqVcPCz
Or, you can walk through it step by step, with these instructions below.
PULLING A LIST FROM INFUSIONSOFT TO UPLOAD TO ICONTACT
- Step 1: After you log in to Infusionsoft, hover the green Infusionsoft logo at the top left of the page & click on Contacts under “CRM”
- Step 2: Select the tag you want to pull from the Tag IDs box. Please note that there are thousands of tags, so it’s best to know the tag category before entering this step.
- You can pull a certain tag by using the Tag IDs box #1, and then exclude a certain tag by using the Tag IDs box #2, selecting the “Doesn’t have ANY of these Tags” option, and selecting the tag you want to exclude.
- Step 3: Hit “Search.”
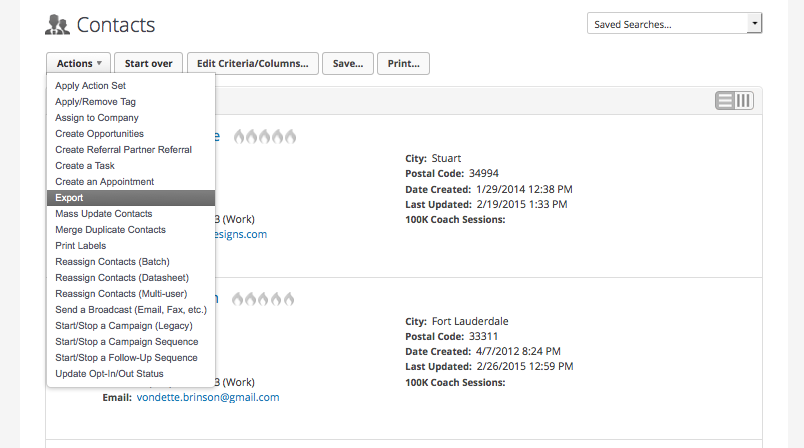
- Step 4: Once you have your list, click the top left button that says “Actions” & select “Export“
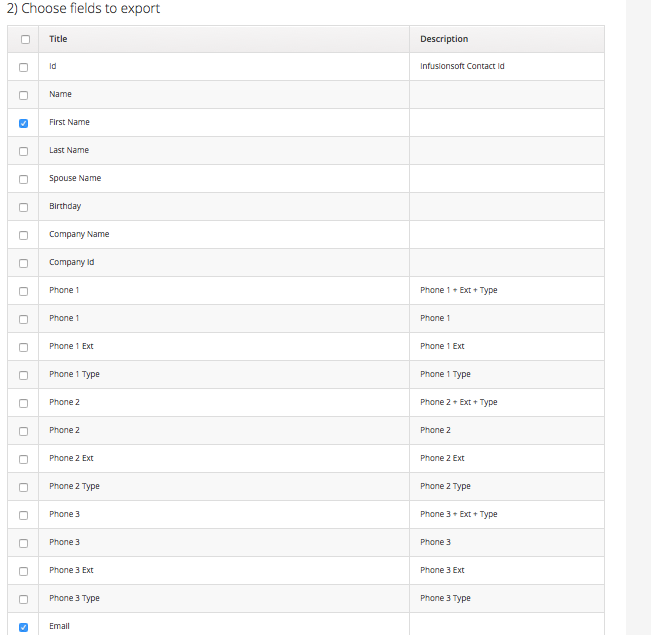
- Step 5: Click the “Title” box so that all of the fields will be unchecked, then scroll down & manually select the “First Name” & “Email” fields.
- Step 6: Scroll all the way to the bottom of the page & hit “Process.” Your list will be saved as a .CSV file.
- Step 7: Once you download the list, save it somewhere to your computer where you can find it easily and upload it to iContact.
UPLOADING A LIST TO ICONTACT
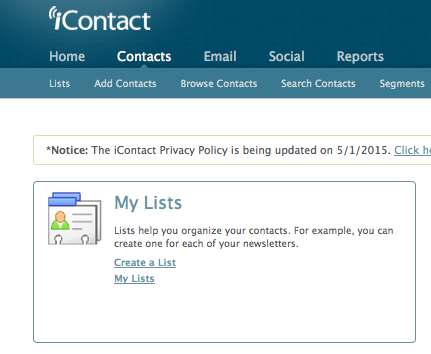
- Step 1: After you log in to iContact, click on the “Contacts” tab
- Step 2: If you’re uploading a brand-new list, select “Create A List.” If you’re adding to a list that already exists, select “My Lists.“
- If you’re adding to a list that already exists, click “My Lists” >> Find the list you’re looking for, and then hit “Add” under the “Subscribers” tab.
- Then, select “Upload contacts from a file” to upload the list you just pulled.
- Hit the “Browse” button to find the list you just pulled & then upload it.
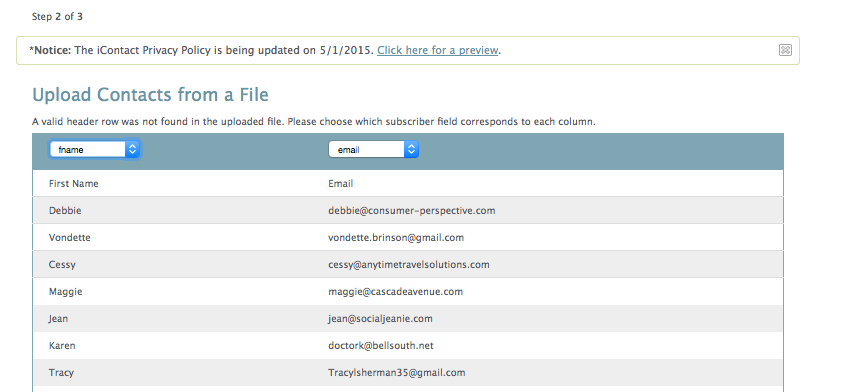
- You might need to name the fields you are uploading with how iContact likes to see them (just match up the first name with the “fname” merge field, and the email with the “email” merge field)
- Confirm this list upload with your initials & boom, you’re done.
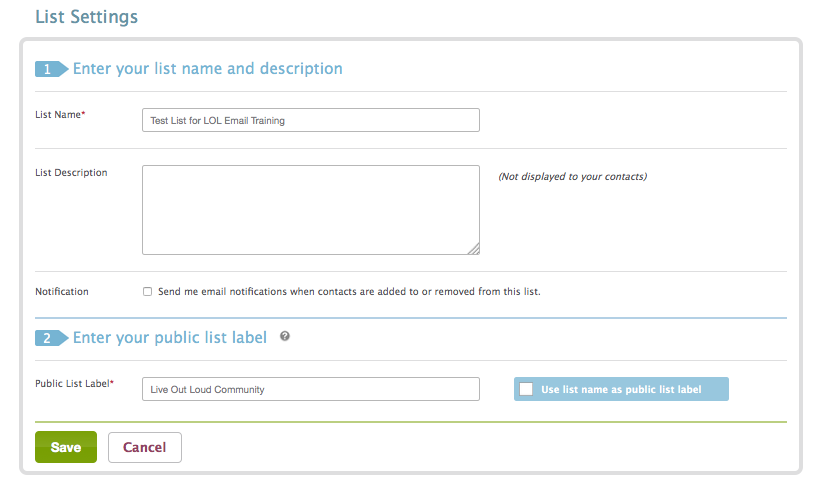
- Step 3: If you’re uploading a new list, select “Create a List” >> Then name the list in this format “MonthDateYear Event Detail“. So, this is an example of that format: “030515 Loral Unplugged Registrants“. Then, I’d be able to tell that this is a registrant list from a Loral Unplugged event on March 5, 2015.
- In the “Enter your public list label” field, de-select the “Use list name as public list label ” option, and enter “Live Out Loud Community.” This is the name of the list people see when they opt out or look at the lists they are subscribed to.
- Step 4: When you hit save, you’ll be brought to a screen to upload your list. Hit the “Browse” button to find the list you just pulled & then upload it.
- Step 5: Name the fields you are uploading with how iContact likes to see them (just match up the first name with the “fname” merge field, and the email with the “email” merge field)
- Step 6: Confirm this list upload with your initials & boom, you’re done.
ACTUALLY SENDING OUT THE EMAIL
- Step 1: After you log in to iContact, click the “Email” tab
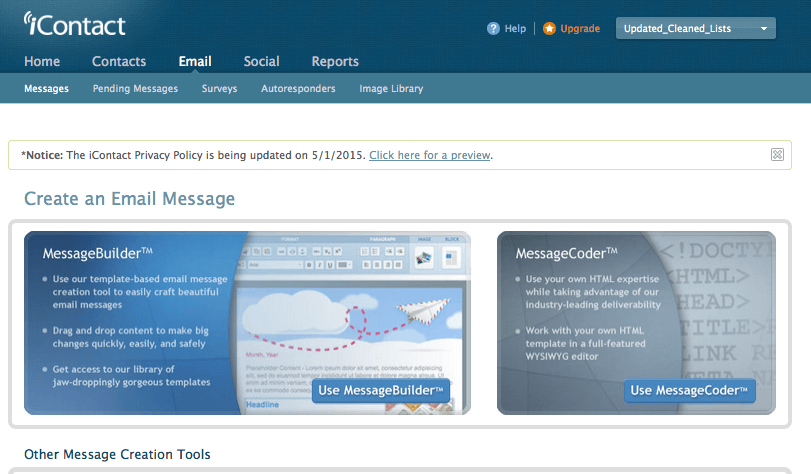
- Step 2: Hit “Create A Message“
- Step 3: Select the “Message Coder” option on the right-hand side
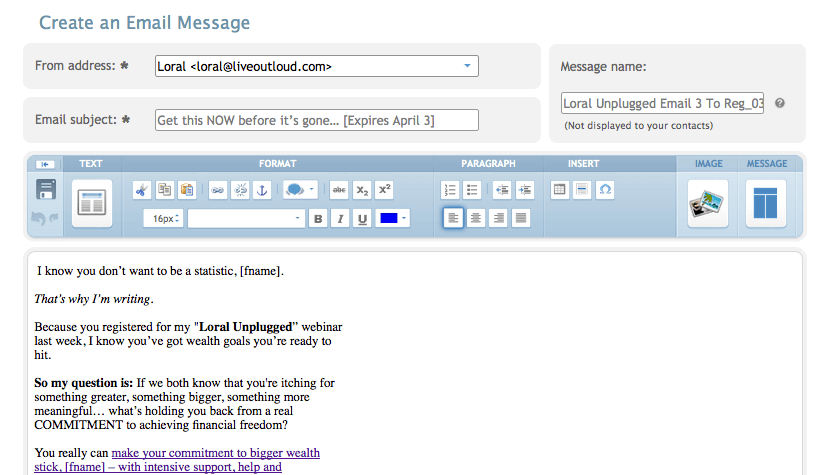
- Step 4: Select who the email is supposed to be sent from in the top box of the page.
- Step 5: Enter the subject line you were given.
- Step 6: Copy & paste the text you were given into a plain text file so it removes all of the formatting, and then copy and paste it into the email body.
- Format the email accordingly, making it look exactly as it was sent to you.
- Make sure to add hyperlinks wherever they are called for.
- Add the [fname] merge field if you want to use a person’s first name, as they have it on file.
- Step 7: Add a “Message Name” to the email on the top right corner of the page. This name is for internal purposes, so name it something that will make it easy for you to remember in case you have to return to it in the future.
- Step 8: Once your message is formatted correctly & named appropriately, click the “Message” tab and select the “Test” button. Send yourself a test to your email account.
- You want to make sure: The formatting looks good, the links work, the email is from the appropriate person, the merge fields all work, the images look fine, etc.
- Step 9: Once you’re happy with the test email, go back into iContact & select “Proceed to Send“
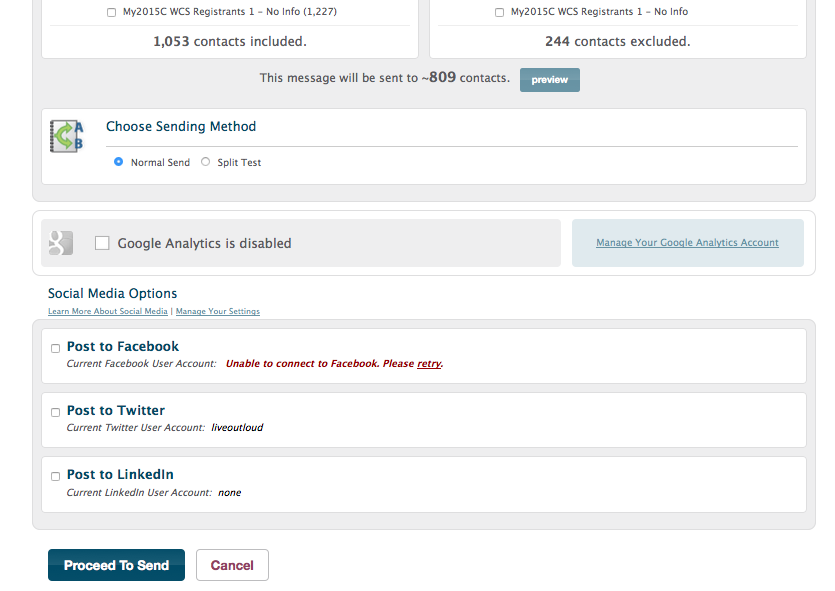
- Step 10: Select the list you want to send this email to – and exclude the lists you don’t want to send this email to.
- This is important because if you’re sending out a webinar invite, but 1,000 people have already registered for this webinar, you don’t want to invite those 1,000 people again. So, exclude that list of 1,000 people. Make sense?
- Step 11: Once you’ve included & excluded the proper lists, scroll all the way to the bottom of the page & select “Proceed to Send“
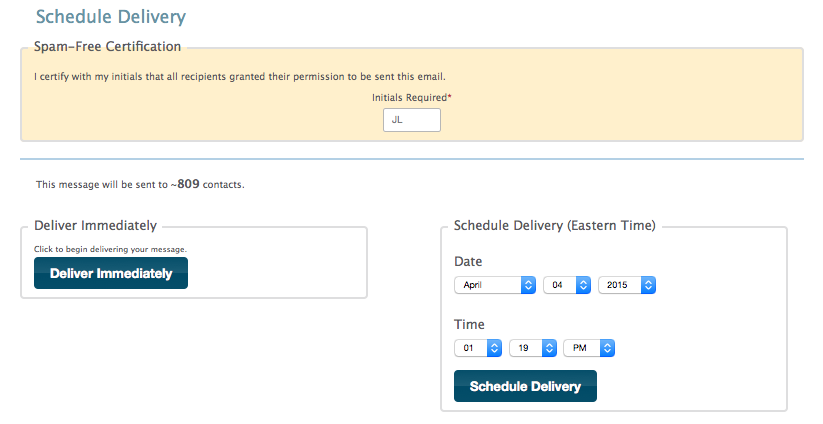
- Step 12: You’ll be taken to a screen where you will select what time you want the email to go out.
- Keep in mind that this system works on East Coast Time, so scheduled your messages accordingly. Some messages are sent to the United Kingdom, others to Australia, others to West Coast time – so always keep the time of day in mind & schedule your emails appropriately.
- Step 13: Once your time is set, enter your initials & hit “Schedule Delivery“. Boom, you’re done!
REVIEWING EMAIL STATS
After sending out an email, you might be asked to retrieve email stats (open rates, click rates, etc.). Here’s how you do that:
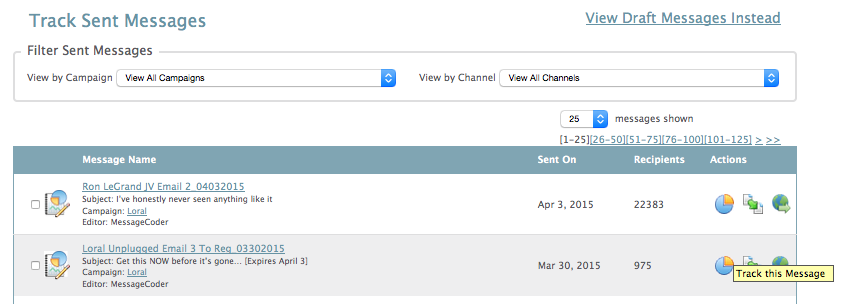
- Step 1: Click the “Email” tab.
- Step 2: Select “Re-Use A Sent Message” link
- Step 3: Find the email you want to review stats on & select the little pie chart on the right-hand side of it. When you hover over the chart, it will say, “Track This Message“
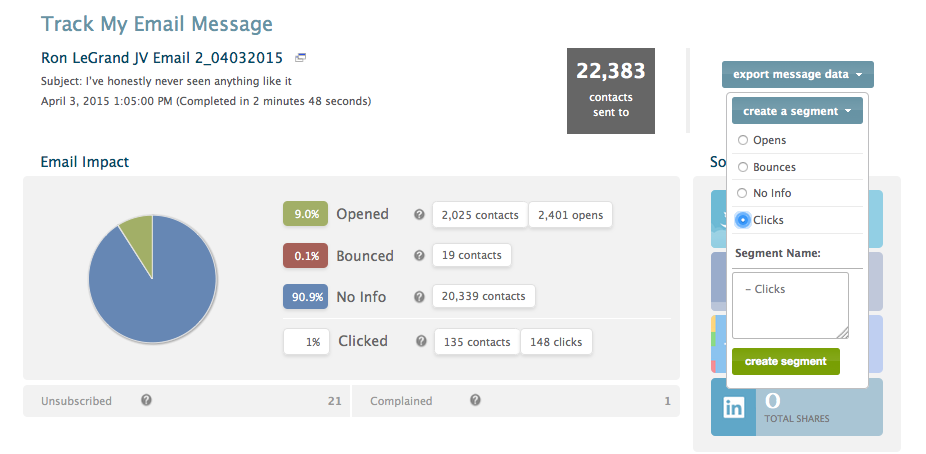
- Step 4: It will bring you to a screen where you can view how many people the email was sent to, how many people clicked on it, how many opened it, etc.
- BONUS Step 5: Let’s say you want to send a 2nd webinar invite email to our list, but you only want to you want to send another email to those who clicked a link on email #1. You can go to “Create A Segment” on the right-hand side of the page, and select which segment you want to create.
- If you want to create a segment out of the people who “Clicked” on that message, select “Clicks,” name it something specific to that email, then, this list will be created in your “Lists.” So, you can send an email ONLY to those people who clicked on the first message.
